
How to Start USA Blogging in India Step-by-Step Guide
Introduction
In today’s digital age, starting a news blog can be an exciting and rewarding venture. If you’re looking to share your thoughts, insights, and news updates with a wider audience, this guide will walk you through the entire process of setting up a news blog in India. This tutorial is based on the successful example of tz t.com, which has shown remarkable growth since its inception. Whether you’re a seasoned writer or a beginner, this step-by-step guide will help you navigate the complexities of starting your own news blog.
1. First of all Understanding the Basics of Blogging
Before diving into the technical aspects, it’s essential to understand what a news blog is. A news blog is a platform where you can share news articles, opinions, and updates on various topics. It can cover a wide range of subjects, including politics, finance, entertainment, technology, and more. The key to a successful news blog is to provide valuable content that engages your audience and keeps them coming back for more.
2. Setting Up Your Blog
A. Hosting and Domain Requirements
The first step in starting your news blog is to choose a reliable hosting provider and domain name. Hosting is where your website’s files are stored, and a domain name is your website’s address on the internet. For this tutorial, we recommend using Hostinger as your hosting provider. Hostinger is known for its excellent performance, affordability, and outstanding customer support.
When you sign up for Hostinger, you can take advantage of a special offer that provides a 10% discount if you use the affiliate link provided in the video description. This discount can help you save money while getting started.
B. Choosing a Hosting Plan
Hostinger offers several hosting plans, but for a news blog, we recommend the Premium Plan. This plan allows you to host multiple websites, which is beneficial if you plan to expand your blog in the future. It comes with 25 GB of SSD storage, a free domain, and unlimited free SSL certificates, which are essential for securing your website.
When selecting a plan, consider your budget and the features you need. If you’re just starting, the Premium Plan is a great choice as it provides ample resources without breaking the bank.
3. Payment Process
Once you’ve selected your hosting plan, it’s time to make the payment. Hostinger offers various payment options, including credit cards, UPI, and PayPal. If you’re using UPI, don’t worry about the payment limit; it will only show a higher limit for authorization purposes, but the actual amount charged will be as per your selected plan.
After completing the payment, you will receive a confirmation, and you can proceed to the next steps.
4. Creating Your Website
A. Signing Up
To create your website, you’ll need to sign up using your Gmail ID. It’s advisable to create a new Gmail account that reflects your blog’s name, as this will help you maintain a professional image. Once you’ve signed up, you’ll be directed to the billing address page, where you can fill in your details.
B. Installing WordPress
After signing up, you can install WordPress, which is the most popular content management system (CMS) for bloggers. WordPress is user-friendly and offers a plethora of themes and plugins that can enhance your blog’s functionality.
To install WordPress, follow these steps:
- Log in to your Hostinger account.
- Navigate to the “Website” section and select “Install WordPress.”
- Follow the prompts to complete the installation.
5. Customizing Your Blog
A. Choosing a Theme
Once WordPress is installed, the next step is to choose a theme for your blog. A theme determines the overall look and feel of your website. For a news blog, we recommend using the GeneratePress theme. This theme is lightweight, customizable, and optimized for speed, which is crucial for user experience and SEO.
To install GeneratePress:
- Go to the “Appearance” section in your WordPress dashboard.
- Click on “Themes” and then “Add New.”
- Search for “GeneratePress” and click “Install.”
B. Essential Plugins
Plugins are tools that add functionality to your WordPress site. For a news blog, there are several essential plugins you should consider installing:
- Rank Math: This SEO plugin helps optimize your content for search engines, ensuring that your articles rank higher in search results.
- Google Site Kit: This plugin integrates Google Analytics and Search Console into your WordPress dashboard, allowing you to track your website’s performance easily.
- WPForms: This plugin allows you to create contact forms, making it easy for your readers to reach out to you.
To install a plugin:
- Go to the “Plugins” section in your WordPress dashboard.
- Click on “Add New” and search for the desired plugin.
C. Setting Up Essential Pages
Once you have your theme and plugins installed, it’s crucial to create some essential pages for your blog. These pages not only provide important information to your readers but also help establish your blog’s credibility. Here are the key pages you should create:
-
About Us Page: This page tells your readers who you are, what your blog is about, and what they can expect from your content. You can use tools like ChatGPT to help draft this content. Simply ask it to generate an “About Us” page based on your blog’s focus.
-
Privacy Policy: This page outlines how you collect, use, and protect your readers’ data. It’s essential for compliance with various regulations, especially if you plan to monetize your blog.
-
Disclaimer: A disclaimer informs your readers about the nature of your content, especially if you provide opinions or advice. It protects you legally by clarifying that the information provided is for informational purposes only.
-
Terms of Use: This page sets the rules for using your website and can help protect your content from misuse.
-
Contact Us Page: This page allows readers to reach out to you with questions, feedback, or collaboration inquiries. You can use WPForms to create a simple contact form.
To create these pages, go to the “Pages” section in your WordPress dashboard, click “Add New,” and start drafting your content. Once you’re done, publish each page.
6. Creating Categories for Your Blog
Categories help organize your content and make it easier for readers to find what they’re interested in. For a news blog, you might want to create categories based on different topics, such as:
- Politics
- Finance
- Technology
- Entertainment
- Sports
To create categories:
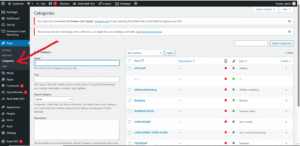
- Go to the “Posts” section in your WordPress dashboard.
- Click on “Categories.”
- Add new categories by entering the name and clicking “Add New Category.”
Once you have your categories set up, you can assign them to your posts when you create new content.
7. Writing and Publishing Your First Post
Now that your blog is set up and organized, it’s time to write your first post. Here’s how to do it:
-
Creating a New Post: Go to the “Posts” section and click on “Add New.” This will open the post editor.
-
Writing Your Content: Start by writing a catchy title that reflects the content of your article. Then, write the body of your post. Make sure to provide valuable information, use subheadings for better readability, and include images or videos where relevant.
-
SEO Optimization: Use the Rank Math plugin to optimize your post for search engines. Add a focus keyword, meta description, and ensure that your content is structured well. Rank Math will provide suggestions to improve your SEO score.
-
Adding Categories and Tags: On the right side of the post editor, you can assign categories and tags to your post. This helps with organization and improves SEO.
-
Publishing Your Post: Once you’re satisfied with your content, click the “Publish” button. Your post is now live for your readers to see!
8. Promoting Your Blog
After publishing your first post, it’s essential to promote your blog to attract readers. Here are some effective strategies:
-
Social Media: Share your posts on social media platforms like Facebook, Twitter, Instagram, and LinkedIn. Create engaging posts that encourage your followers to read and share your content.
-
Email Marketing: Build an email list by offering a newsletter subscription. Use tools like Mailchimp to manage your email campaigns and keep your subscribers updated with your latest posts.
-
Networking: Connect with other bloggers and influencers in your niche. Collaborate on guest posts or social media promotions to reach a wider audience.
-
SEO: Continue optimizing your content for search engines. Research keywords related to your niche and incorporate them into your posts to improve visibility.
-
Engagement: Encourage readers to leave comments and engage with your content. Respond to comments to build a community around your blog.
9. Analyzing Your Blog’s Performance
To ensure your blog is growing and reaching its target audience, it’s crucial to analyze its performance regularly. Here’s how to do it:
-
Google Analytics: Use the Google Site Kit plugin to integrate Google Analytics into your WordPress dashboard. This tool will help you track visitor behavior, traffic sources, and popular content.
-
Search Console: Monitor your blog’s performance in search results using Google Search Console. This tool provides insights into how your site appears in search results and helps identify any issues that need fixing.
Thank you so much please keep supporting !!
Please visit my Homepage